|

Any comments or to add your site to the link page please
contact the
Webmaster
| |
Window channels are prom to rust and decay mainly due to then being a water
trap. We know all about water here in the UK.. its seems like it is always
pissing down...
Replacement of window rubbers at about 8 year intervals.. or prior to
cracking can have a great benefit to your channels... once they have gone..
there is quite a lot of work ahead.
I am by no means an expert welder, sprayer, car body specialist or any think
else like that.
All this work was undertaken in my small garage driveway
Here is a pictorial on the repair of a window channel. All the work was
carried out in one afternoon, about 5 hours. The tools used are listed below.
The steps for a repair
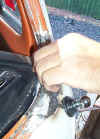
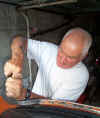
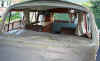
| Remove the windscreen. This is done by pushing
from the inside, prying the rubber back to start things off. I normally
start in the top right hand corner, pushing real hard from the inside.
Have someone outside of steady the window as it comes out. |
 |
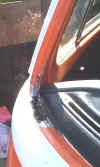
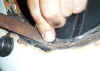
| Once out.. checkout those channels. Bet they
looked great with the window in... get ride of all that shit and rust...
if necessary grind away any loose rust. Then get that grinder to all that
decay....sparks everywhere... great |

|
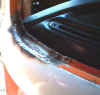
| Cut out all the rust, leaving enough space to
weld up the new piece of metal. |

|
| The next step is to measure up you pieces of
plate, then weld them into place. Like this, you will need to grind away
any over weld too. |
|
| Once that has been done, filling takes place,
try to draw file to get a nice finish. Go on Bob, get in there!!! |
|
| A small amount of filler was used to get a
really smooth finish, this was sanded back and then coated in white
primer.
Masked up and spayed up...all ready for the final coat. |
|
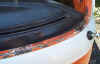
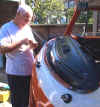
| So there we have it, the finished window channel... do you
think he looks happy?
The next step is to put the window back in.. easy, have a look here There
is my bus in the background too |


|


|
Tips of the trade
 | Don't try and do it yourself, get someone to help |
| Get the wife to make the teas..... Oh |
| Don't rush |
| Take photos for history |
| Work in a clean area |
| Tidy up |
Tools of the trade
| A grinder, I use a 4inch ( about £18 used, £30 new |
| A low amp Mig welder... (about £80 second hand... £150 new) |
| A spray gun, air line and compressor. (These are not essential, you can
use spray cans) |
| A pair of large tin snips |
| 40 grit sand paper |
| 240 wet and dry |
| A small amount of plastic padding |
| Cellulose thinners and paint |
| Masking tape and newspaper |
Materials of the trade
| Sheet metal ( This I get from a local car repair yard... I take the left
overs) |
| Washing up liquid, soap.. for window install |
If you have any question email them to me at 72bay@webco.screaming.net
|